
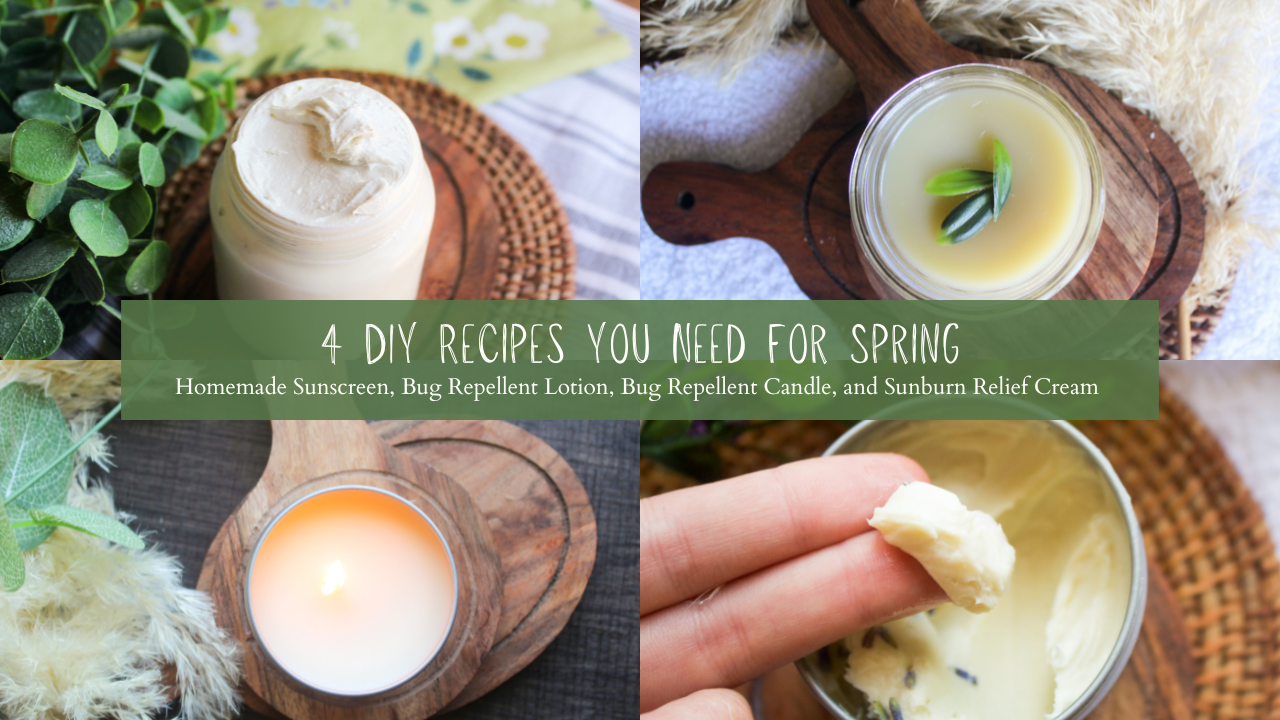

Okay… one of these recipes is a bug-repellent candle, but I had to use skincare in the title for google-search purposes. If you live in a place like mine, spring is hot and sunny (most of the time). DIY skincare recipes like homemade sunscreen, Bug-repellent lotion, and sunburn relief cream are essential this time of year. Also, a bug-repellent candle keeps those freshly hatched mosquitos away!
Many store-bought products aimed at repelling bugs and protecting you from the sun can be filled with chemicals. Switching to homemade skincare can significantly reduce your exposure to toxins.
Here Are Your 4 Must-Have DIY Skincare Recipes for Spring
Natural Homemade Sunscreen Recipe

How do you make natural sunscreen at home?
Ingredients:
- Shea Butter
- Coconut Oil
- Beeswax
- Non-Nano Zinc Oxide
- Essential Oils
Directions:
- Melt the shea butter and coconut oil over a double boiler.
- Once melted, turn the heat off and mix in the remaining ingredients.
- Allow the DIY homemade sunscreen to sit at room temperature for about an hour until it has fully set.
- Apply as needed.
It is that simple! Now, you might have a few questions about making sunscreen at home. Here are some common questions that most people wonder when making a DIY natural sunscreen recipe.
Tips For Avoiding a Sunburn
- Wear a homemade natural sunscreen (to learn about the toxic ingredients in conventional store-bought sunscreens, keep reading.)
- Limit sun exposure to increments of 2 hours at a time before seeking shade, then reentering into the sunshine.
- Optional, wear large hats to cover sensitive areas like your face, neck, and shoulders.
Is Homemade Sunscreen Waterproof?
The answer is yes. You might find it odd to add beeswax to a homemade sunscreen recipe but beeswax is the key to making the sunscreen waterproof. If you’ve ever used beeswax on your skin before you will know that it wicks away water, allowing the homemade sunscreen to stay active on your skin even while getting wet.
It is important to note; that using too much beeswax can cause the homemade natural sunscreen to not set properly. Therefore, following the recipe measurements is important with this one.
What is Non-Nano Zinc Oxide?
This is essentially the SPF part of the natural sunscreen recipe. According to this article, “Zinc oxide sits on top of your skin (rather than soaking in, as chemical sunscreens do) and protects you by scattering, absorbing, and reflecting the sun’s rays. It can stand alone as a sunblock because it is truly effective against UVA, UVB, and even UVC rays — this is called a “broad-spectrum blocker.” But zinc oxide isn’t just effective at blocking the sun! It’s also good for your skin.”
Another great thing about using non-nano zinc oxide is that it is considered safe for marine animals, whereas nano zinc oxide is not safe for marine animals. To read more about that, check out this study.
Homemade Sunscreen with Essential Oils
I love adding essential oils to almost every homemade recipe. Essential oils add a great fragrance when used in natural sunscreen made at home. If using peppermint essential oil in your DIY natural sunscreen recipe as I did, your skin will feel cool and tingly, in a good way, when using this sunscreen.
If you want to make this sunscreen a 2-in1 deal, aka, bug repellent and sunscreen, there are some essential oils to repel bugs that you can use. Examples: peppermint, citronella (great for repelling mosquitos), and eucalyptus. To learn more about essential oils that repel bugs, check out my DIY Bug Repellent Lotion Recipe.
Here are some essential oils for homemade sunscreen:
The Toxic Ingredients in Conventional Sunscreens
In recent years, some studies have exposed the toxic and harmful ingredients used in common conventional sunscreens. Some of the harmful ingredients include oxybenzone, octinoxate, homosalate, and nanoparticles. Not only are these ingredients harmful when used on our bodies, but they are also harmful to marine animals. When swimming in the ocean specifically, I am sure you have seen your sunscreen leave an oil trail next to where you are in the water. Leaving that trail behind means the marine animals will encounter it, later on, harming them the same way it harms us.
To read more about the harmful effects of conventional sunscreen, check out this website.
If you do end up with a sunburn, check out my Natural Sunburn Relief Cream recipe to help ease the pain and discomfort of a sunburn.
How to Properly Store Sunscreen
When making a DIY sunscreen recipe with essential oils, it is important to store the sunscreen in a glass container. Essential oils have the capability of breaking down plastic over a long period of time therefore it is better to be safe than sorry and just use glass. Make sure to use a tight lid on whichever glass container you choose.
Glass Containers for Storing Sunscreen:

DIY Natural Homemade Sunscreen Recipe
Ingredients:
- 1/2 Cup Shea Butter
- 1/4 Cup Coconut Oil
- 2 Tablespoons Beeswax
- 2 Tablespoons Non-Nano Zinc Oxide
- 10-20 Drops Peppermint Essential Oil
Directions:
1. Melt the shea butter and coconut oil over a double boiler.
2. Once melted, turn the heat off and whisk in the remaining ingredients.
3. Allow the DIY homemade sunscreen to sit at room temperature for about an hour until it has been fully set.
4. Store in an airtight glass container and apply as needed.
Notes:
It is nearly impossible to measure exactly how much SPF this natural homemade sunscreen has, however, it is safe to assume the SPF is around 30, give or take.
This sunscreen is generally safe to be used anywhere you would normally apply sunscreen, like your face. Just be sure to use essential oils that you are not allergic to and be sure to keep the sunscreen out of your eyes.
Use your best judgment when applying this to your children. I use this on my kid’s age 6 months and up with no issues. Some kids might have sensitive skin when using essential oils, so feel free to omit that.
DIY Bug Repellent Lotion

Dealing with bugs in the summer is inevitable, especially mosquitos. These little insects love to eat me up all spring and summer. That is why I decided to make my own DIY bug repellent lotion. When using this lotion, I notice a significant reduction in the number of mosquito bites I get when I’m outside, it has been a life saver!
How Do You Make DIY Bug Repellent Lotion?
- Shea Butter
- Coconut Oil
- Arrowroot Powder
- Essential Oils
You might be wondering, what can I put on my skin to keep bugs away? The key to this DIY bug repellent lotion is the essential oils, this is what will help repel the mosquitoes, as well as other bugs. There are a few different essential oils you can use to repel certain bugs, for example, citronella is a great oil to use when you want to repel mosquitoes.
Essential Oils for Bugs
Citronella
Citronella essential oil is great for repelling mosquitoes. If you have ever purchased a “bug-off” spray from the store, this usually contains artificial citronella fragrance.
Peppermint
Peppermint essential oil is truly one of the most versatile essential oils, especially when it comes to pests. It is one of the strongest natural insect repellents. This essential oil can be effective at repelling ticks, mosquitoes, moths, spiders, you name it.
Eucalyptus
Eucalyptus essential oil is great for repelling mosquitoes. There was a study done in 2014 that showed eucalyptus oil provided more than 95% of protection from mosquitoes for up to 3 hours.
Nature Shield Blend
Nature Shield Blend is a great all-in-one blend to have on hand. This blend combines the citronella and eucalyptus essential oils plus a few others, making it very effective at repelling mosquitoes.
Kids Shield-Me Blend
If you plan to use this DIY mosquito repellent lotion on little kids, I recommend using the Shield-Me essential oil blend because it is deemed kid-safe.
Shea Butter Mosquito Repellent Lotion
Shea butter is my favorite ingredient to use in my homemade lotion recipes. Once melted and solidified, shea butter truly feels like butter on your skin. Although shea butter might feel a bit oily, it is extremely moisturizing for the skin. You can purchase the shea butter I use right here.
Coconut Oil for Skin
Coconut oil is a versatile ingredient, having benefits when used in the kitchen and your skincare. According to this article, “There are different mechanical and chemical processes that are used to manufacture coconut oil—for use in skincare, unrefined (virgin or extra-virgin) cold-pressed coconut oil is what’s recommended.” This is because when coconut oil is cold-pressed, meaning the oil is removed without the use of heat, the process is thought to retain more of the oil’s nutrients compared to other processing methods.
How to Use DIY Bug Repellent Lotion
Using this lotion is simple, just apply the lotion to areas you find mosquitoes bite you the most. Me, I am often a bit on my legs and arms therefore I always apply the lotion in those places before going outside during the spring and summer.

DIY Bug Repellent Lotion Recipe:
Ingredients:
- 1/2 Cup Shea Butter
- 1/4 Cup Coconut Oil
- 1 Tablespoon Arrowroot Powder
- 10 Drops Citronella Essential Oil
- 10 Drops Eucalyptus Essential Oil
- 5 Drops Peppermint Essential Oil
- (Optional) 5 Drops Nature Shield Essential Oil
Instructions:
- Set up a double boiler on the stove, this is a pot filled 1/3 of the way up with boiling water and a heat-safe bowl placed on top.
- Once the double boiler is hot, add your shea butter and coconut oil into the heat-safe bowl. Stir continuously until both have melted completely.
- When the shea butter and coconut oil are melted, turn off the heat.
- Add the essential oils and stir until combined.
- Working quickly, pour the hot mixture into your lotion container, I like using mason jars since they are heat-safe.
- Allow the DIY mosquito repellent lotion to set completely on the counter, this will take a few hours if it is hot inside your house. You can also put it in the fridge to set up quickly.
- Once completely set, take a small dime-size amount of lotion and apply it to your body. A little goes a long way!

How to Make a Bug Repellent Candle
It is that time of year again, the bugs are out and trying to come inside. Living in the south, bugs are something we deal with all year however, the mosquitos, flies, gnats, and a whole host of other bugs show up in great quantities during the spring and summer. This bug repellent candle is simple to make, only requires a few ingredients, and is effective at keeping (most) bugs away.
Before learning about the negative effects artificial fragrances and chemicals can have on our bodies, I, like most people, would go to the store and buy a generic brand bug repellent candle. Now, once educating myself on how harmful these candles can really be, I make my own every year using this recipe.
To learn a little bit more about creating beeswax candles, check out my blog post HERE.
Two Ingredient Bug Repellent Candle
There are only two simple ingredients needed to make this DIY bug repellent candle:
- Beeswax (buy it here)
- Essential Oils
For this recipe, I used a combination of essential oils including peppermint, eucalyptus, and citronella, although using just one can still make an effective bug repellent candle.
Bug Repellent Essential Oils
This is a classic scent used in most generic brand mosquito repellent sprays and candles. As I mentioned before, the artificial fragrances and chemicals used to make these repellents can be toxic for us to inhale. When using a pure citronella scent, like with this essential oil, there are no artificial fragrances or chemicals. With that being said, this scent is great for repelling a lot of bugs but in particular, mosquitoes.
Peppermint essential oil can be effective for many different things throughout the home. I personally love using peppermint oil in my garden to keep pests away as well as in a candle like this bug repellent candle to keep most insects away from the inside of my house.
Eucalyptus oil is great for keeping mosquitoes away. There was a study done in 2014 that showed “eucalyptus oil provided more than 95% protection against mosquitoes for 3 hours.”, You can find that study here.
Thyme is another wonderful essential oil to use when making a bug repellent candle, There was a study done that showed thyme to be a more effective mosquito repellent than DEET. You can see that study here.
Clary sage essential oil is typically associated with women’s health, particularly in its ability to induce labor naturally (I would know, it induced my second labor very quickly!), however, there are also properties to the essential oil that help to deter many insects including mosquitoes.
Creating a combination using any of these essential oils to make a bug repellent candle can be an effective method to keep bugs away from your home.

How to Make a Bug Repellent Candle:
What you need:
- 100% organic beeswax, I like this one.
- Essential oils (Peppermint, Eucalyptus, Citronella)
- Glass bowl or measuring cup
- Stovetop pot to boil water
- Utensil to stir
- Candle Container, I use these.
- Candle Wick
Directions:
- Make a double boiler by filling your pot with water 1/3 of the way up. Once the water is boiling, add your glass bowl or measuring cup on top of the pot so the water is hitting the bottom of the glass.
- Add the candle wick to the candle container.
- Pour in beeswax pellets and stir consistently until they are completely melted.
- Once the beeswax has melted, turn off the heat, add your essential oils, and continue to stir.
- Immediately pour melted beeswax into your candle container, the beeswax will harden quickly so this process must be fast. If your beeswax happens to harden before you are able to pour it into the candle mold, turn the pot of water back on and reheat the glass bowl or measuring cup until the beeswax melts again.
- Allow the candle to completely set before using, mine usually takes around 30 minutes – 1 hour depending on how big the candle container is.
- I like to burn my candle near the back door so when the door is open to let the kids or dogs in and out of the backyard, the bugs aren’t tempted to hurry inside while the door is open.
Natural Sunburn Relief Cream

Even with using sunscreen, which by the way, I would recommend using a natural sunscreen like this one if you don’t want to make your own, there are times when sunburn is inevitable.
Sunburns can be avoided, for the most part, by limiting your time in the sun to increments of 2 hours and using a natural sunscreen if desired. When sunburn does appear, it can be painful and uncomfortable. I love to use this sunburn relief cream on my whole family. The aloe vera brings instant relief from that burning feeling while the shea butter moisturizes the skin, aiding in quicker healing of the sunburn.
Tips for avoiding a sunburn:
Unfortunately over the years, many people have had the belief that the sun is bad for us, but it really isn’t. The vitamin D we receive from direct sunlight is essential for optimal health and overall wellness. With that being said, sunburn is one side effect of being in direct sunlight. There are a few things we can do to avoid sunburn when possible, such as;
- Limit sun exposure to increments of 2 hours, taking a small brake inside or in the shade before going back out for a few hours.
- Use a natural sunscreen, this is a great one that our family loves.
- Wear a wide brim hat to protect the most common areas where our skin burns, such as our face and shoulders.
Aloe vera for sunburn:
Growing up at the beach meant lots of sunburns for me when I was a child. My mom would always apply aloe vera to my skin after a long day in the sun, however, it was always the bright green kind from the drugstore. After learning more about harmful ingredients, I have come to realize this artificial aloe vera we see on most store shelves is actually toxic. It is full of artificial dyes, preservatives, and many other hormone-disrupting ingredients.
If you do not have access to an actual aloe vera plant, where you can use the gel inside the leaves of the plant, using a pure aloe vera, with ingredients that are easily pronounced and understood is the next best option for our skin. This aloe vera has the best ingredients for something that is shelf-stable, at least that I have found.
According to this article, “Aloe vera is soothing and moisturizing, and it has cooling properties. This makes it an ideal and inexpensive choice for soothing the pain of minor sunburns at home. Sunburned skin loses moisture, and applying aloe may help retain skin moisture due to a substance called mucopolysaccharides found in the plant.”
Make sure the aloe vera you choose is a gel, not a liquid. This will help the mixture solidify once cooled.
Shea butter for sunburn:
Sunburns usually cause the skin to become dry and peel off. Applying a natural sunburn cream with shea butter, like the one in this recipe, can help to moisturize the affected area. Once the area has become moisturized, the skin can begin to heal.
According to this article, “One suggestion for an especially potent sunburn moisturizer comes from Dr. Ernest Brown, founder of Doctors To You: shea butter. “In addition to moisturizing the skin (which helps to reduce infection), shea butter is packed with nutrients and vitamins that increase its healing properties.”
Lavender essential oil for sunburn:
Lavender essential oil is great for natural pain relief. When adding the oil to the natural sunburn relief cream, be sure to only use a few drops since essential oils are very potent.
According to this article, “Just like chamomile, lavender oil also has anti-inflammatory and antioxidant properties to treat sunburn, says Dr. Sobel. A 2004 study refers to lavender as “one of the mildest of known plant essential oils,” making it a safer pick if you have sensitive skin.”

How to Make Sunburn Relief Cream:
What you need:
Directions:
- Begin by setting up a double boiler, this is a pot of water filled 1/3 of the way up, brought to a boil, with a glass or heat-safe bowl on top.
- Once the double boiler is ready, add in your shea butter.
- Allow the shea butter to melt completely.
- Once melted, turn off the heat.
- Add in the remaining ingredients and mix thoroughly.
- Pour into your container of choice, remember this is a lotion so you will not be able to squeeze or pump this out, a wide mouth jar like this is a good option.
- Once cooled, put cream in a stand up mixer or mix with a handheld mixer using a whisk attachment. (see notes)
- Apply as needed
Notes:
Although whipping the cream is an extra step, it helps to ensure the aloe vera and shea butter mix completely. During the cooling process, the aloe vera gel and shea butter tend to separate, therefore mixing them together after the natural sunburn relief cream has cooled allows the cream to provide its full benefits.
You can watch a tutorial on making all of these recipes right here!


