
")
There’s a nostalgic feeling when you see a row of mason jars lined up on the counter. It takes me Ma Ingall’s house in Little House on the Prairie. Whether they hold sourdough starter, fermented pickles, herbal tea blends, or even craft supplies, jars are a staple in a natural, rooted home.
While what’s inside the jar matters most, a simple cloth cover tied neatly over the top adds an extra bit of charm. I prefer mine with a snug fit, a soft fabric, and a handmade feel — which is why I make all my jar toppers using a beginner-friendly sewing technique I call the “pocket method.”
Some of the links in this post are affiliate links, meaning I may earn a small commission at no extra cost to you if you make a purchase through them. Thank you for supporting my blog!
Learning how to sew a jar cover is perfect for:
Covering ferments like sourdough or kombucha
Dressing up gifts like jams, sugar scrubs, or bath salts
Keeping dust out of pantry jars
Adding a handmade touch to open shelving
If you’re new to sewing, this is a great first project. No tricky closures, no zippers or fancy curves — just a neat little circle, a hidden elastic channel, and a lovely result you’ll reach for again and again.
What is the Pocket Method?
When I say “pocket method,” I’m referring to how we create a fabric casing (or channel) to run elastic through. Instead of stitching elastic directly to the fabric, we enclose it — much like the waistband of a skirt or pajama pants.
This makes the finished jar cover look neat, hold its shape well, and last longer with repeated use and washing.
Supplies You’ll Need When Learning How to Sew a Jar Cover
")
This project is simple and uses scraps you likely already have:
• Sewing machine or needle/thread (see further down for beginner sewing machine recommendations)
• Woven fabric (cotton, muslin, linen — non-stretchy)
• Pencil, chalk, or washable fabric marker
• Ruler or measuring tape
• Iron (optional but helpful)
Equipment & Tools Needed for Sewing Jar Covers
To begin with, If you’re new to sewing, you don’t need anything fancy to get started with this project. Learning how to sew a jar cover is truly so simple. Here’s a list of beginner-friendly equipment and tools that will make sewing your fabric jar covers easy and enjoyable:
Beginner Sewing Machines to Consider
• Brother XM2701 — A popular, budget-friendly machine with easy-to-use features, perfect for beginners (this is the one I have!)
• Brother CS7000x — Lightweight with multiple stitch options and easy setup
• Singer MX60 — Simple and reliable with basic stitches for everyday projects
• Janome 2212 — Durable and straightforward, great for learning basic sewing techniques
All these sewing machines come with clear manuals and customer support, making them ideal for beginner sewists who want to sew projects like fabric jar covers, simple garments, or home decor.
Step-by-Step: How to Sew a Fabric Jar Cover with Elastic Using a Casing
")
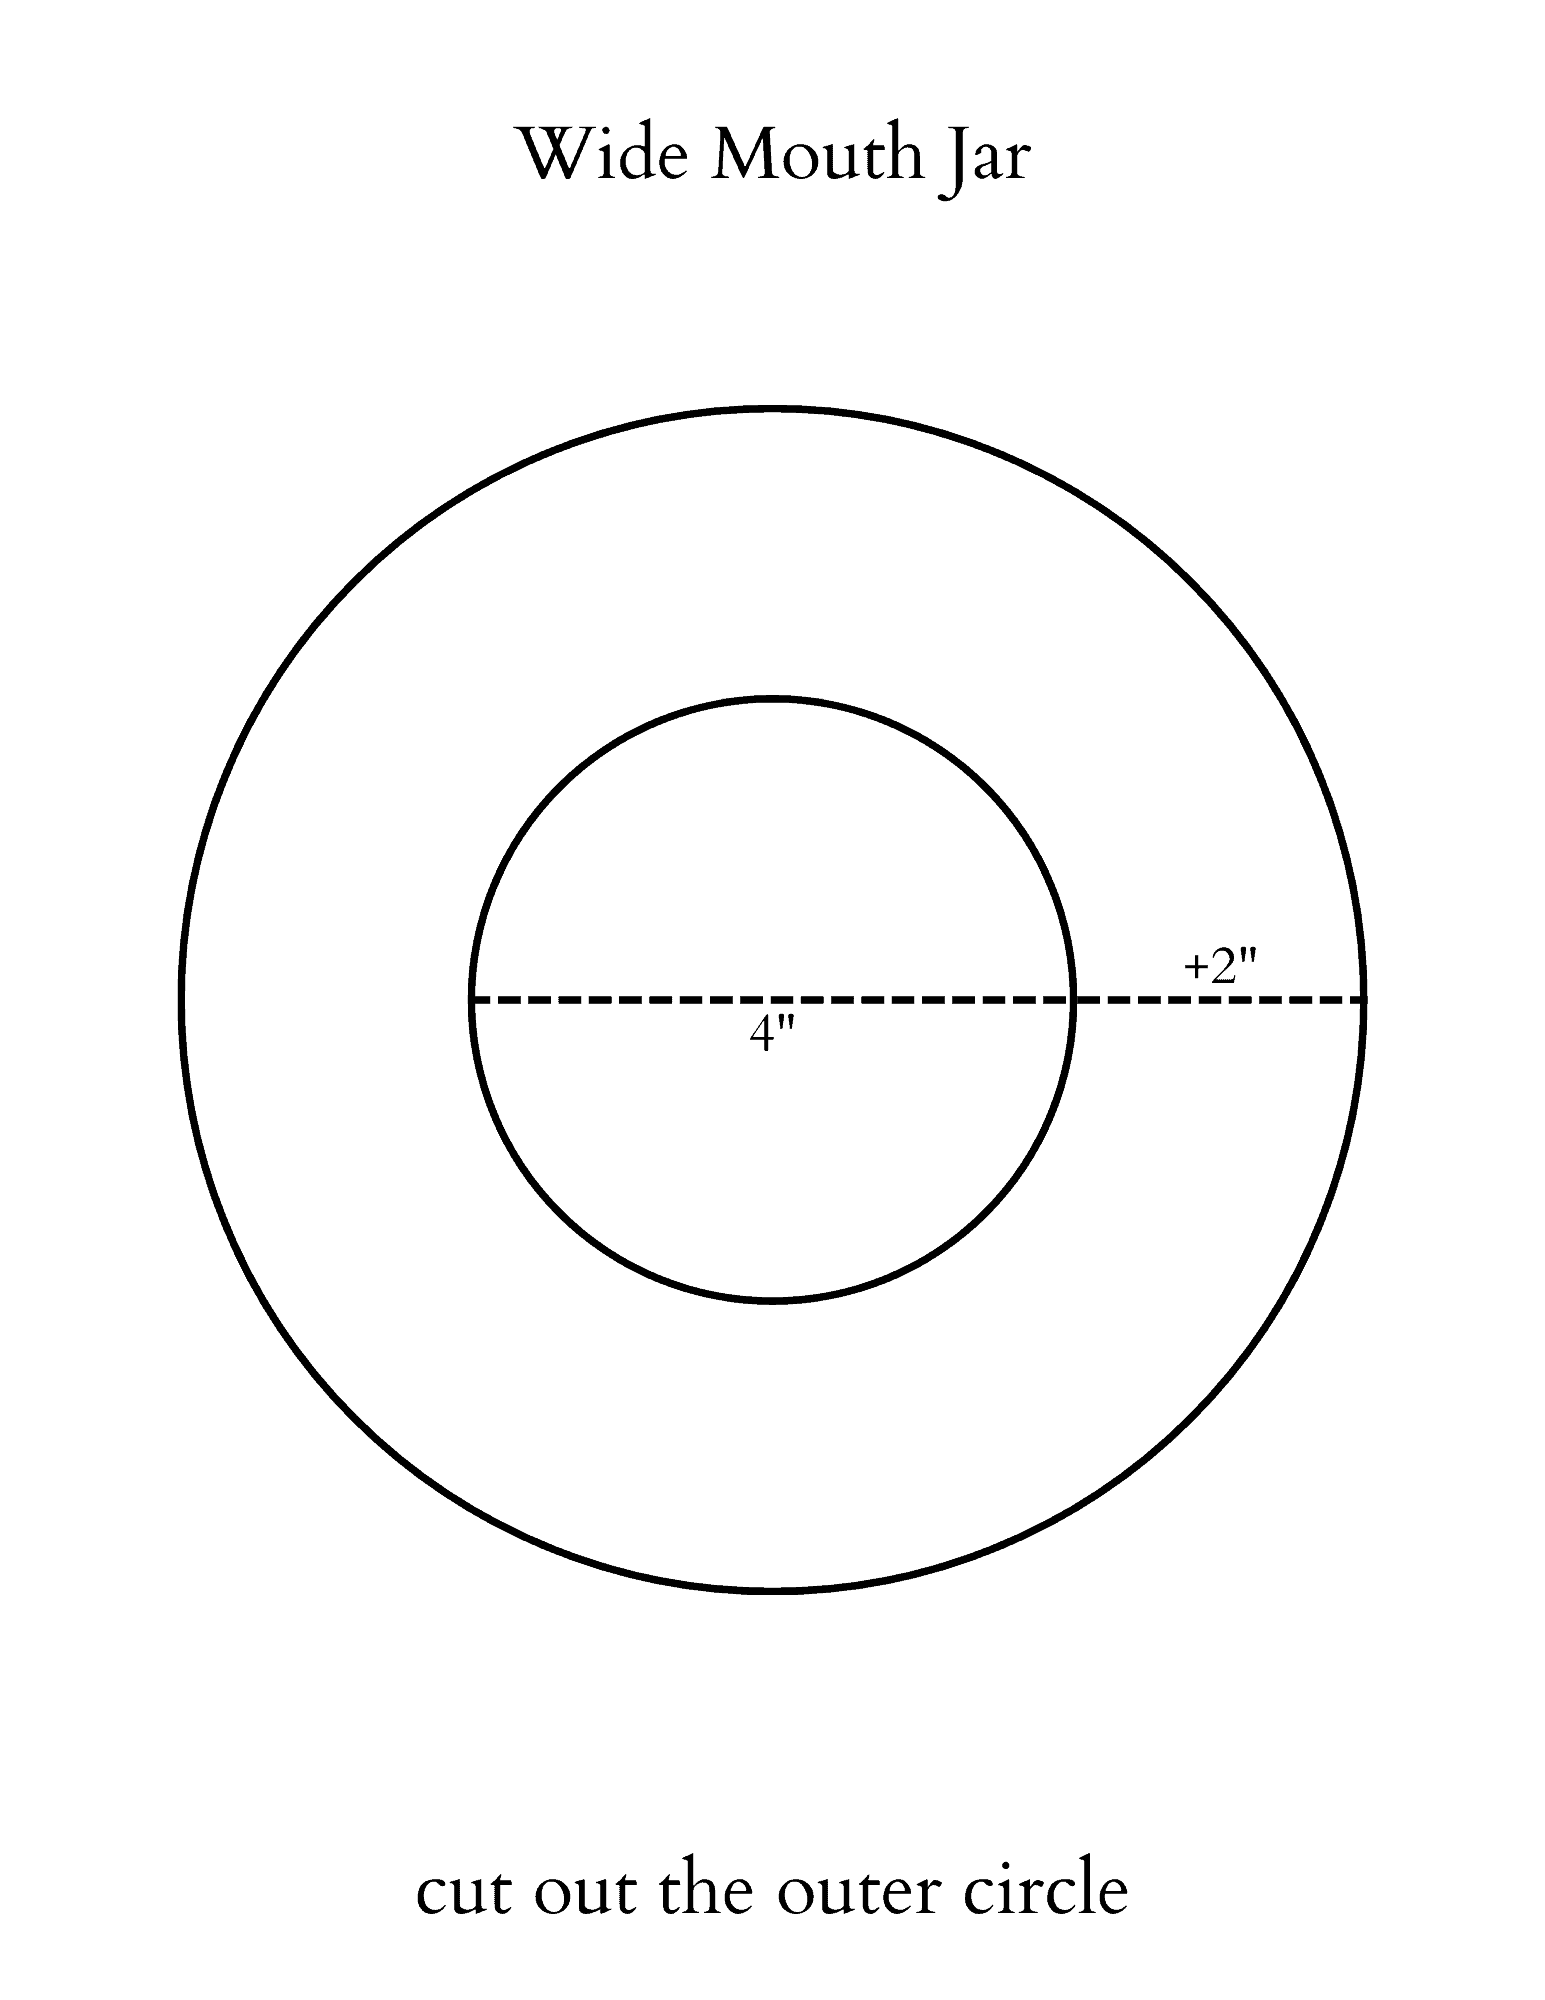
1. Measure Your Jar
Start by measuring the diameter of your jar lid. Then add about 2 inches to account for overhang and the elastic casing.
For example, if your mason jar lid measures 2 inches across, cut a fabric circle about 4 inches in diameter. If you’re using these exact measurements, you can follow my pattern below. If not, use this as a general rule of thumb to size your fabric circles.
You will need 2 identical circles for this project.
Cut one circle at a time or stack and cut multiple circles if you want to make several covers in one sitting.
2. Cut Your Fabric
Cut 2 circles of fabric using your measurement. You can layer and cut multiple circles if you plan to make several jar covers at once.
I like to use old fabric scraps, vintage pillowcases, or leftover quilt pieces. Any woven, non-stretchy fabric works well.
Here’s a pattern I drafted to help you visualize the exact dimensions and seam allowances for your jar cover:
Download the Printable HERE⬇
")
This pattern will guide you as you cut and sew, making the project even easier.
3. Finish the Edge (Optional)
To keep your jar cover durable and prevent fraying, finish the raw edges of the fabric circle with:
A zigzag stitch around the edge
Pinking shears for a clean cut
Or serging if you have a serger machine
This step isn’t mandatory but helps your jar covers last longer.
4. Create the Casing
")
Now it’s time to create the pocket (casing) for your elastic.
Put right sides together — this means the two sides of fabric you want to show on the finished project are facing each other, so you’ll be sewing with the wrong side (backside) of the fabric visible.
Set your sewing machine to a stitch length of 2.5 mm and stitch width of 0 mm (for a straight stitch).
With right sides together, sew a ½” seam all around the fabric circle, leaving a 2″ gap unstitched on one side.
Use that 2″ gap to turn the fabric right side out so the pattern is now on the outside.
5. Sew the Elastic Casing, Leaving an Opening
Sew around the edge about ½ inch from the fold to secure the casing for the elastic.
Leave the 2-inch gap open so you can thread the elastic through.
Go slowly around the curves, and enjoy the steady rhythm of sewing.
6. Thread the Elastic Through the Casing
Cut a piece of ¼-inch elastic about 2 inches shorter than your jar lid’s circumference to create a snug fit.
Attach a safety pin to one end of the elastic and feed it through the fabric casing. Work it all the way around until it comes out the other side.
7. Sew the Elastic Ends and Close the Gap
Overlap the elastic ends about ½ inch and sew them securely together.
Carefully tuck the elastic into the casing, then sew the opening closed with a straight stitch.
8. Fit Your Jar Cover
Stretch your finished elastic jar cover over your jar. It should hold snugly around the lid, providing a charming and practical fabric cover.
Watch the video tutorial here:
How to Use a Jar Cover
These fabric jar covers get a lot of use around here. Some ideas include:
• Topping jars of ferments, granola, oats, or nuts
• Covering rising dough or kefir during fermentation
• Dressing up jars of homemade bath salts, scrubs, or cotton rounds
• Gifting jars of jam or sugar scrub with a handmade touch
• Organizing craft supplies and keeping them dust-free
The Easy Way to Sew a Jar Cover: Make a Whole Set
Once you make one, you’ll likely want a drawer full. Try making:
• Matching covers for open-shelf storage
• A mix of florals and gingham for seasonal jams
• Holiday-themed covers for gifting
• A kitchen set with matching tea towels, potholders, and jar covers
These covers are simple, quick, and beginner-friendly—perfect for using up fabric scraps and adding beauty to your home.
A Moment of Slow Homemaking
")
Overall, Sewing isn’t something I do out of necessity—I do it because I want to. There’s something grounding about making small, useful things by hand. Making a jar cover might seem like an extra step in today’s fast world of plastic lids and disposables, but for me, it’s a quiet act of care. We can make the choice to slow down, tend to our home, and create order in the small things.
To sum it up, When I slip a fabric cover over a jar of steeping herbs or tie one onto a sourdough starter, it reminds me that this simple work is enough.
Tips for Success
• Use cotton or linen that breathes and holds up well to washing.
• Don’t overtighten your elastic; it should stretch easily but hold snug.
• Add a little ribbon, lace, or trim for a personal touch.
• Attach a small fabric tag with the jar contents for a homemade label.
Pin It, Save It, Share It
If you make a jar cover, share a photo on Instagram and tag me—I love seeing your projects. @naturalrootedhome
Did you find this helpful? pin it to your “Homemaking” or “Simple Sewing” board to find it easily later.
")
You don’t need a craft room or fancy equipment to make something beautiful. All you need is a bit of fabric, some elastic, and a few quiet minutes.
Hi, I’m Ashley — mama, maker, and lover of all things from-scratch. Around here, you’ll usually find me barefoot in the kitchen, covered in flour or beeswax, with kids underfoot and something simmering on the stove. I believe in slow living, simple joys, and the kind of home that smells like cinnamon rolls and sunshine. Find out more about me here.

